4. Installing GOAD in a VirtualBox Lab
This page is part of a broader series on creating a cybersecurity lab with VirtualBox.
Click here to return to the main project description page.
What is GOAD?
GOAD (Game Of Active Directory) is a pre-built, intentionally vulnerable Active Directory environment created by Orange Cyberdefense designed for penetration testers. Its main purpose is to provide a ready-to-use lab for practicing common attack techniques in a realistic domain setting. The goal of the project is to let you sharpen your AD pentesting skills without the hassle of setting up everything from scratch.
For this homelab, we will use Vagrant for provisionning and run it on VirtualBox.
👉 Official documentation: https://orange-cyberdefense.github.io/GOAD/
System Requirements
GOAD is quite resource-intensive. You should allocate (approximatively):
| Variant | VMs | CPU + RAM | Storage | Use Case |
|---|---|---|---|---|
| GOAD (Full) | 5 | 8 vCPU + 24 GB RAM | ~115 GB | Full forest, trusts, and labs |
| GOAD-Light | 3 | 4 vCPU + 20 GB RAM | ~20 GB | Lighter scenarios |
| GOAD-Mini | 2 | 2–4 vCPU + 16 GB | ~16 GB | Minimal lab (DC + client only) |
| SCCM | 4 | Similar to full | ~More | SCCM-focused use cases |
Windows Server images consume ~14–22 GB each. Ensure at least 115 GB free on your disk for GOAD (Full) to prevent provisioning failures.
Ensure your host has enough RAM to run all VMs. If you're short on memory, consider tweaking the default values or using GOAD-Mini or GOAD-Light.
Prerequisites
You'll need the following tools installed:
Installing GOAD
Follow the instructions for installing GOAD on VirtualBox in a Windows OS listed on the official documentation website here
Make sure to change the default directory where the scripts download and install the VMs if you don't have enough space on the default partition, or if you want to organize the lab files in a specific location with sufficient disk space. To do this, follow the instructions below before the install.
Change Folder Where Vagrant Downloads Boxes
By default, Vagrant stores boxes in ~/.vagrant.d/.
To change this, set the environment variable in your Debian WSL:
export VAGRANT_HOME=/your/custom/folder
Change Folder Where VirtualBox Creates VMs
- Open VirtualBox Preferences
- Go to General > Default Machine Folder
- Choose your preferred location

You should have this configuration before installing to follow along with our homelab deployment :
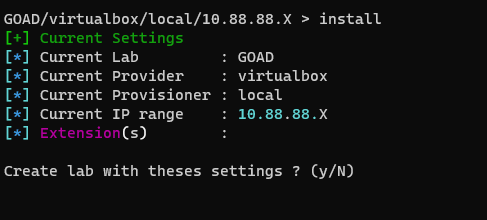
Folow the documentation listed here to learn how to set these options, or simply use the following commands from GOAD's interactive mode command line :
> set_lab GOAD
> set_ip_range 10.88.88
> set_provider virtualbox
> Install
Troubleshooting Common Issues While installing
For troubleshooting, check out the official guide at: https://github.com/Orange-Cyberdefense/GOAD/blob/main/docs/mkdocs/docs/troobleshoot.md
For any other issues, check the official GitHub Issues page to see if your problem has already been reported and how it was resolved.
For example, I personally encountered internet connectivity issues on some machines. I had to log in manually using the vagrant account (vagrant:vagrant) to fix the DNS settings of the NAT interface.
Another issue occurred during the execution of the ad-child_domain.yml playbook, which got stuck at the "Add child domain to parent domain on dc02" task. This was already reported here.
If a playbook fails, sometimes the best solution is to restart all the VMs and re-run the playbooks — starting from the one that failed — to avoid redoing previously completed steps. You can do this with:
instance_id > provision_lab_from ad-child_domain.yml
Depending on the lab you selected (the default being GOAD), you can refer to the list of available playbooks here: GOAD playbooks list Always read the output carefully to track the progress and spot any errors.
VMs Freezing
If VMs freeze or the playbook hangs, try:
- Restarting all VMs
- Unchecking Nested Paging
- Enabling Legacy Paravirtualization
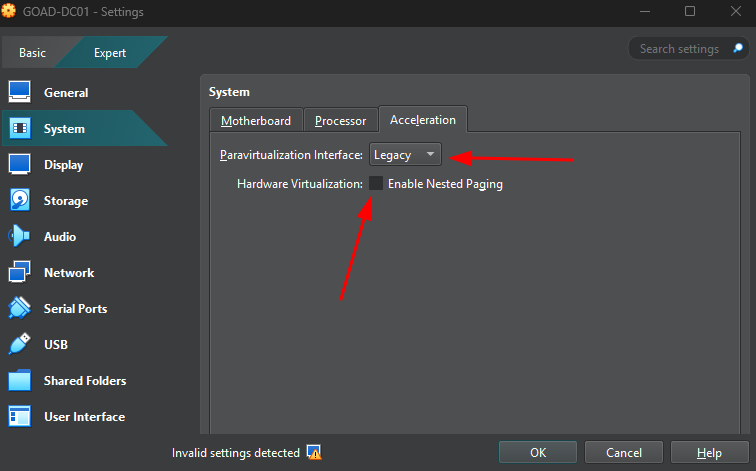
Disabling Nested Paging in VirtualBox settings.
You can revert to the default values after GOAD is installed to improve performance and hardware resource management for the VMs by virtualbox.
WinRM Authentication Failed
Edit the Vagrantfile to allow plaintext WinRM (only for lab use!):
config.winrm.transport = "plaintext"
config.winrm.basic_auth_only = true
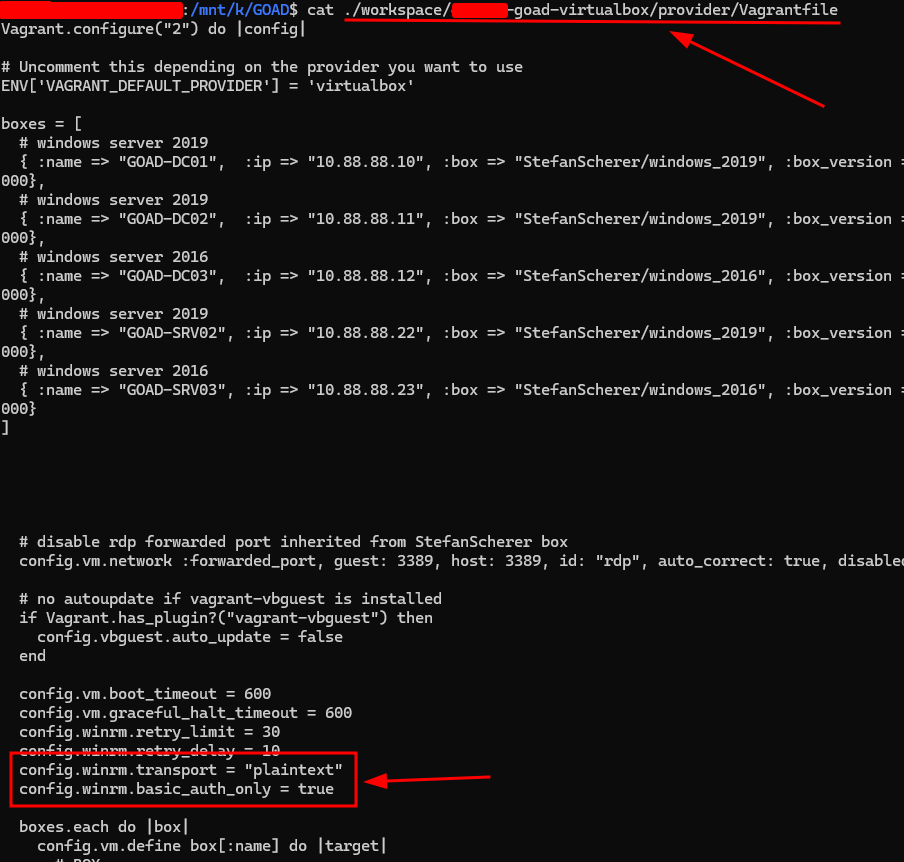
WinRM plaintext configuration for provisioning to succeed.
Configuring VirtualBox Networking
Once the installation is successful, take a snapshot of your virtual machines. This will save you a lot of time if you need to roll back later.
To integrate GOAD with the rest of our lab, we’ll want to ensure the GOAD VMs are on the "Homelab - AD" internal network. Use this PowerShell snippet to deactivate the first network interface set to NAT (we won't need it because we will use our pfSense firewall/router to reach the internet) and add a second network interface set as the Homelab - AD to connect to our pfSense router :
$VBoxManage = "C:\Program Files\Oracle\VirtualBox\VBoxManage.exe"
$vmNames = @("GOAD-DC01", "GOAD-DC02", "GOAD-DC03", "GOAD-SRV02", "GOAD-SRV03")
$networkName = "Homelab - AD"
$adapterType = "82540EM" # Intel PRO/1000 MT
$promiscuousMode = "deny"

foreach ($vm in $vmNames) {
  & "$VBoxManage" modifyvm $vm --nic1 none
  & "$VBoxManage" modifyvm $vm --nic2 intnet
  & "$VBoxManage" modifyvm $vm --intnet2 "$networkName"
  & "$VBoxManage" modifyvm $vm --nictype2 $adapterType
  & "$VBoxManage" modifyvm $vm --cableconnected2 on
  & "$VBoxManage" modifyvm $vm --nicpromisc2 $promiscuousMode
}
Network Configuration for Internet Access and Lab Functionality
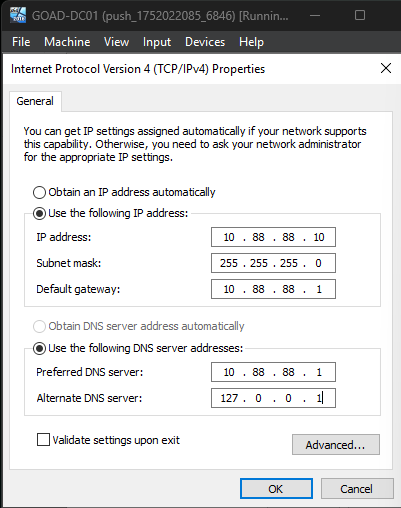
The following manual network configuration has been tested and confirmed to work for both internet access and proper lab functionality. To apply these settings, log in manually using the vagrant account (vagrant:vagrant)and navigate to:
Network Settings > Interface Ethernet 2 > IPv4 Settings
Update only the Preferred DNS, Alternate DNS, and Default Gateway fields. Leave all other fields unchanged — they are automatically set by the Vagrant provisioning scripts.
DC01
- Preferred DNS Server:
10.88.88.1 - Alternate DNS Server:
127.0.0.1 - Default Gateway:
10.88.88.1
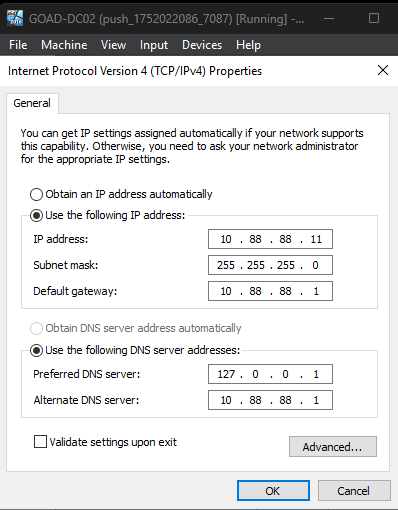
DC02
- Preferred DNS Server:
10.88.88.1 - Alternate DNS Server:
127.0.0.1 - Default Gateway:
10.88.88.1
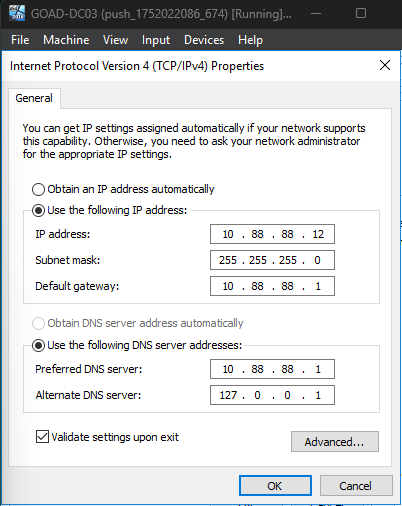
DC03
- Preferred DNS Server:
10.88.88.1 - Alternate DNS Server:
127.0.0.1 - Default Gateway:
10.88.88.1
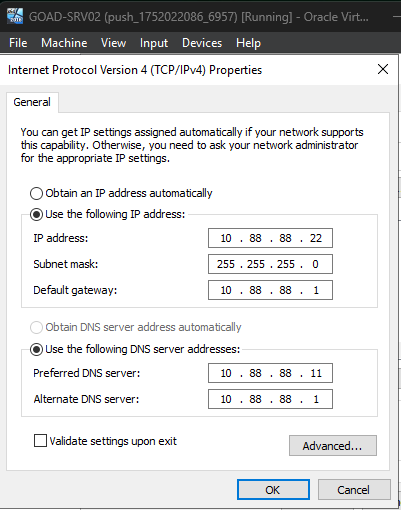
SRV02
- Preferred DNS Server:
10.88.88.11 - Alternate DNS Server:
10.88.88.1 - Default Gateway:
10.88.88.1
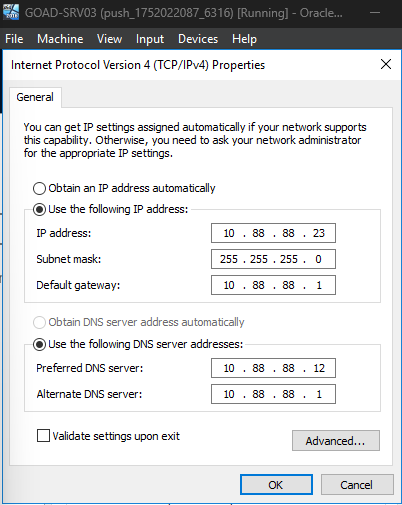
SRV03
- Preferred DNS Server:
10.88.88.12 - Alternate DNS Server:
10.88.88.1 - Default Gateway:
10.88.88.1
If you install additional machines or extensions into the lab, make sure to apply the same network configuration as described above.
This is necessary to ensure proper integration into the homelab environment and to guarantee internet access from those machines.
Adding Extensions
You can add extensions to the lab, here
guacamole : Add a vm with guacamole to get a quick access on lab exchange : Add an exchange to GOAD or GOAD-Light lab ws01 : Add an hardened workstation to GOAD or GOAD-Light lab lx01 : Add a linux vm to GOAD or GOAD-Light lab wazuh : Add wazuh EDR to visualize alerts (is convered in the next module, installed manually, gives more options and demostrates how to set everything up, plus you would need to redo some steps because the SOC and AD are two different subnets) elk : Add an ELK to collect and read the logs
Before installing, revert the snaphosts back and the networking ooptions back to what they were to guarantee everything works correctly
Congratulations !
pfSense is now fully configured with proper segmentation and firewall rules. Your lab environment is ready to deploy employee workstations and install security tools for hands-on testing and analysis.
Proceed to the next section if you want to deploy the full lab or add one of the environnements described here.